Showing posts with label crafts. Show all posts

Sunday, March 13, 2011

Chalkboard Decor


I have been seeing some really cute ideas for using chalkboard paint  out across the blog land!  I seem to get lost looking at all the creative ideas out there.  I saw a couple of blogs with some crafty ideas, but can't remember all of the blogs, but I got some inspiration from Little Brown House on my chalkboard project.  She painted hers and added some vintage flair to her plates with some dollar store decals.  I finished mine and thought that I should have painted them first, but they still ended up pretty darn cute.
 
Dollar Store metal plates before I painted them with Krylon Chalkboard Paint.  Sorry about the dust! I didn't even see it on the plates before I took the pictures.

Here is how the plates turned out! Cute don't you think, I know that the top plate looks a little off, but it is easily fixed.  I attached the plates with velcro to the wall, so all I need to do is move the top plate down a bit. Easy Peasy! (that is what my 4th graders would say ha.)

Party Tutu

For the Toy Story Party, I made the Birthday Girl this tutu.  I love the way the pink, green, and white sparkles together!  I didn't give directions to this one, because they are the same as the tutu that I already posted back in January for my daughters 1st Birthday.  There are a few things different with this one.  I only made the pieces of tulle 6" by 18". I also tied little pieces of tulle in the matching color about 1"to 2" from the end of the tulle skirt.  If you have any questions let me know!
Fabulous Birthday Tutu, the little flower is from the DollarStore and I just took
it apart and hot glued it to an alligator clip that I lined with ribbon.

Friday, January 7, 2011

Playdough fun

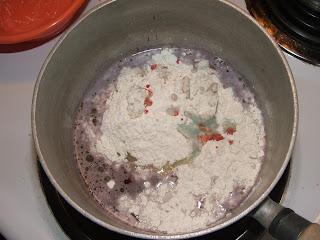
I was checking out my pictures from break and forgot all about when we made playdough.  My son wanted purple, but I didn't mix the food coloring good enough! Oh well we still got a shade of purple. 

If you want to make this version the ingredients are:

Ingredients:
1 cup of plain flour
1 cup of water
1 Tbsp. of cooking oil
1 tsp. cream of tartar
1/2  cup of salt
food coloring

To Make:
Pour all of the ingredients into a sauce pan.  Cook slowly on medium-high and stir it until the playdough thickens. (this happens quick!)
This recipe takes less than 10 minutes


Here are all my ingredients in the sauce pan. Next time I would color the water first because I didn't get the purple I wanted, and it cooks very fast.
Stirring....

Stirring....

All stirred together

I put the play doug in a glass cake dish with flour.  The playdough was very sticky, I wasn't sure if I made it right!

I just kept adding flour until it "felt" like playdough.

My son checking the taste.
Playdough a HIT!

Friday, December 31, 2010

Multi Colored Fun Over Christmas Break

The kiddos and I had lots going on over the Christmas Break from school.  We entertained family and friends and got rested up for the long stretch until spring break. I get to go back to work on Monday and see my other kids. (4th graders)  I love my job, but a big part of me would love to stay home with my own babycakes!  I told my son that momma has to go make some money to pay for new toys! haha. He's not too upset!  My itty bitty baby girl will just be daddy's girl til I get home.  Yes, he works too, but our schedules overlap.  His job entails reminding people to slow down, wear seatbelts, etc.  I'm sure you probably figured out what he does.  (he works for the state)haha!

Well, I have been wanting to try melting crayons together for awhile, and I tried it with my 4th graders at school and failed miserably!  We tried heating them up on the stove and then mixing them together to get a multi-colored crayon.  Long story short they all ended up brown and brownish green.  So, I thought I would try and perfect it at home first, then try again with the school kids.  I have to say they came out pretty cool!

I first took off all the paper off all the crayons.  I found that if I put them in hot water the paper came off a lot better.


I broke up all the crayons and put them in a mini-cupcake pan.  I put them in the oven on 400 degrees for about 7 minutes. 


Beautiful! Look at what came out of the oven, fabulous new crayon colors.


Let them cool for a couple of hours and pull them out of the cupcake wrappers.


My son trying them out


Fun Momma!


I loved doing this!  I am going to look for some silicone molds or candy molds and try it again.  I have a huge tub of crayons at school, that need a little tender love and care. 

Wednesday, December 29, 2010

totally cute crayon tins

This idea is so dang cute! I love the way the crayons look in the cans.  Wow, I am easy to please!  This is a project that I am going to put on my to do list! Check out Mom's Crafty Space for the details!